UI Panel
UI Panel
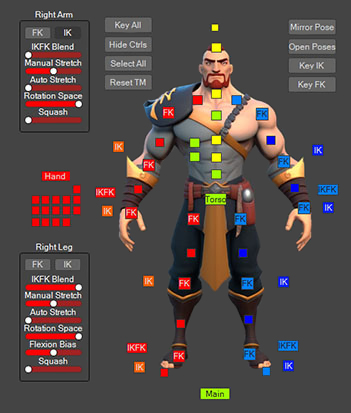
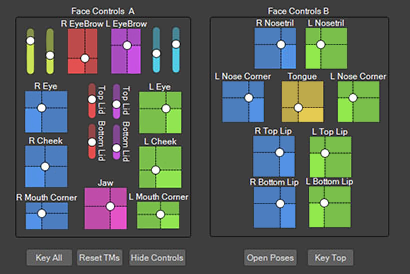
The UI Panel system allows users to create and display custom user interface controls (UI Controls) to manipulate scene elements, particularly for character rigging. It provides a variety of controls for enhanced functionality and workflow efficiency.
It has pickers that can be used to select objects. It has sliders, spinners, 2d sliders and 2d spinners that can be used to animate parameters in the scene. It has action buttons that execute customized commands. It has toggle buttons to turn off and on parameters in the scene. And it also has other type of UI controls like images, groups, and group selections.
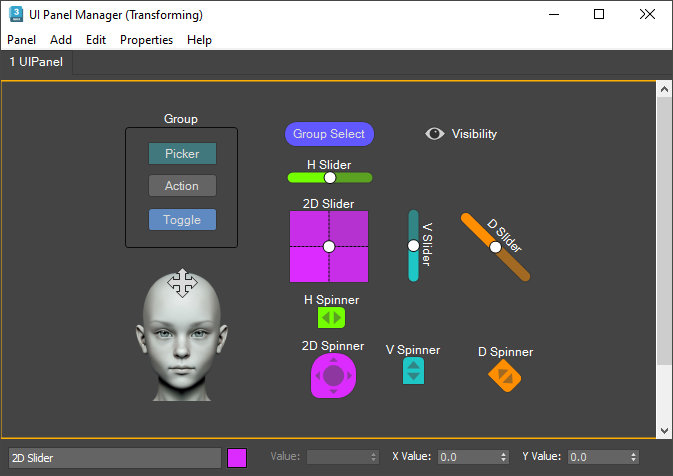
All these different kind of UI Controls can be created in the UI Panel manager dialog window, where the user can define their position and size interactively. The controls will be stored in the UIPanel helper, and there can be several different UIPanels in the scene, each one can be accessed in different tabs in the UI Panel manager after being opened there before.
Creation Method
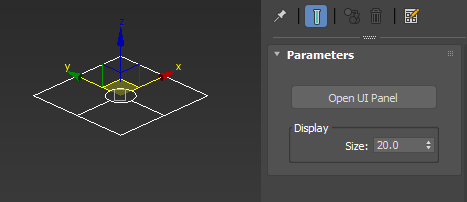
After creating the UI Panel helper, you can open it in the UI Panel manager by pressing the "Open UI Panel" button in the Modify Panel.
You can also access the UI Panel Manager by going to the "Graph Editors" 3ds Max Menu and selecting "UI Panel Manager...". You can create and open UI Panels from the UI Panel Manager as well in the "Panel" Menu, or by right-click in the Tabs Toolbar right below the UI Panel main menu.
Creating UI Controls
In the UI Panel manager you can start creating UI Controls by going to the "Add" Menu and selecting one of the options available, you can also do right click in the panel selecting the "Add" sub menu and then again selecting one of the options available.

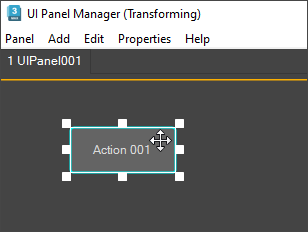
Transform Mode
Just after that the UI Control will be created and UI Panel manager will enter in "Transform" mode, in that mode you can move around and resize the controls interactively. You can turn on/off the transform mode by going to the Edit Menu or Right Click Menu and selecting "Transform". When you turn off the transform mode you can interact with the UI Controls normally.
UI Controls
Selected Objects
When you click on "Selected Objects" the selected objects in the scene will be added to the UI Panel as "Pickers", The picker is a type of UI Control that allows easy selection of objects in the scene, specially useful for selecting control helpers in a character rig. You can change the display name and the color in the bottom toolbar of the UI Panel Manager.
Group Selection
With the Group selection UI Control you can select several objects at the same time by just clicking this control. To create a group selection select first all the objects that you want to include in the same group selection, then right click > select "Add" > and click on "Group Selection".
Visibility
With the Visibility UI Control you can hide and unhide several objects at the same time by just clicking this control. To create a visibility control select first all the objects that you want to include in the same visibility control, then right click > select "Add" > and click on "Visibility".
Picker
This is the UI Control that allows easy selection of objects in the scene, when it's created directly it won't have an object assigned by default. If you want to assign an object, select the Picker > Right click > Set Object > and then select the object in the scene.
Action
With this control you can use maxscript to execute actions in the scene. The script will be executed everytime that the control is picked. You can define the script by selecting the Action control > Right click > Set Script. A Dialog box will appear, there you can write the script and create and use variables that can hold references to objects and elements in the scene.
Toggle
Toggle is a type of UI Control that allows the user to turn on and off a value that can be connected to an element in the scene. When the toggle is turned on. Toggles are particularly useful for animating elements in a scene and can be easily controlled with just a click. Their value can be accessed in the track view and you can use a float connection, for example, to connect it to any float parameter in the scene.
Image
The Image UI Control allows you to add an image to the UI Panel. This is useful for adding background images to the panel. You can select an image file from your computer by first turning on the Transform Mode, then selecting the image control by clicking on the cross-arrow on top of it, then right-click and selecting "Set Image" from the drop-down menu.
Group
The Group UI Control allows you to group other UI Controls together in the UI Panel. This can help to organize the controls and make them easier to visualize. To create a group, select the UI Controls that you want to group together, then right-click and select "Add" > "Group". The new group will appear in the UI Panel, and you can rename it the toolbar at the bottom of the UI Panel Manager.

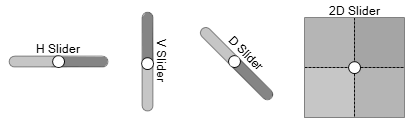
Sliders
The Slider UI Control allows you to set a value by dragging a slider knob along a track. This is useful for animating parameters in the scene, such as parameter in a specific part of a character rig. You can set the minimum and maximum values for the slider, as well as their default value and other properties, by first selecting it, then doing right-click and clicking on "Slider/Spinner Properties". Their value can be accessed in the track view and you can use a float connection, for example, to connect it to any float parameter in the scene.
Sliders can be horizontal, vertical, or diagonal, depending on how the control is set up in the UI Panel. This allows for more flexibility in how the user interacts with the controls and can make them easier to use in different scenarios. You can also have 2D Sliders, with those you can set two values simultaneously by dragging a knob along two perpendicular axes. This is useful for animating parameters that have two dimensions, such as the position of an object in a 2D plane, or the morph targets of a character's face rig.
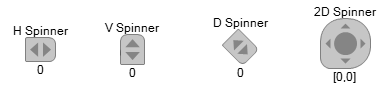
Spinners
Spinners are another type of UI Control that allows you to set a value by clicking their arrows or by clicking and dragging the cursor along the screen. They are similar to sliders but they are not constraint to a specific range. You can also set their properties, by first selecting it, then doing right-click and clicking on "Slider/Spinner Properties". The value can be accessed in the track view and you can use a float connection, for example, to connect it to any float parameter in the scene.
Spinners can also be horizontal, vertical, or diagonal, and they are particularly useful for animating parameters such as rotation angles or scaling factors. Additionally, 2D Spinners can also be used to set two values simultaneously, similar to 2D Sliders.
Set Position/Size Dialog Box
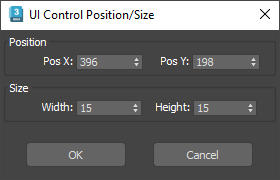
If you need to set the position and size of a UI Control with a specific value you can do so in the "Set Position/Size" Dialog Box. You can access this Dialog box, by first selecting the control you want to modify, then right-click and choosing "Set Position/Size". You can also access in the "Properties" Menu at the top of the UI Panel Manager
Set Script Dialog Box
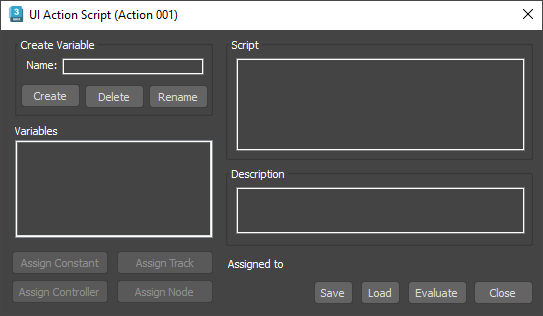
This dialog box allows users to write and edit Maxscript code that will be executed when a corresponding Action UI Control is interacted with. This dialog box provides a text editor where users can write their script using Maxscript language, which includes functions and commands that can manipulate objects, properties, and parameters in the 3D scene. Users can also create and use variables to store references to objects or values that can be manipulated by the script.
The Action UI Control will execute the script whenever the user clicks on the control. This allows users to create customized behaviors and automate repetitive tasks in their 3D scene, improving their workflow and efficiency. You can access this Dialog box, by first selecting the action control you want to modify, then right-click and choosing "Set Script". You can also access it in the "Properties" Menu at the top of the UI Panel Manager.
Slider/Spinner Properties Dialog Box
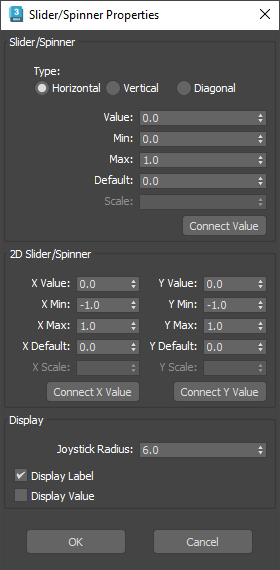
In this Dialog box you can define different attributes for Sliders and Spinners, like the min, max range, the default value, the scale of the spinner, the type (horizontal, vertical or diagonal) and whether or not the label or the value should be displayed on the panel. You can access this Dialog box, by first selecting the slider or spinner control you want to modify, then right-click and choosing "Slider/Spinner Properties". You can also access it in the "Properties" Menu at the top of the UI Panel Manager.
Edit Menu Options
Here you can access additional operations that you can use with the Controls of the UI Panel. This operations can also be accessed in the context menu, by right- clicking on the UI Control.
Transform
Here you can turn on and off the "Transform Mode". With the Transform Mode ON you can change the position and size of the UI Controls interactively. When the Transform Mode is OFF the UI Controls can be used for animation and other interactions in the scene.
Copy
Use this option if you want to copy the selected UI Controls with all their attributes.
Paste
Use this option to paste the UI Controls in the current UI Panel.
Delete
Deletes a control or several controls in the UI Panel.
Alignment
Here you can access different types of alignments for the selected UI Controls: Align Horizontal, Align Vertical, Match Size, Match Width, Match Height, Layout Horizontal, Layout Vertical.
Mirror
Here you can access operations to "Mirror" the position and size of the Controls: Mirror Horizontal, Mirror Vertical, Mirror Horizontal Local and Mirror Vertical Local.
Arrange
Here you can access different types of arrangements for the selected UI Controls: Bring to Front and Send to back. This operations are useful for controls that are overlapped one over the other.
Select All / None / Invert
Use these operations to select or deselect controls in the UI Panel.
Additional Properties Options
Show in Track View
Shows the animatable value parameters of toggles, sliders and spinners in the Track View.
Reset
Sets the animatable value parameters of sliders and spinners to their default value. If the UI Control is a picker or group selection it will reset their objects transformations.
Add Key
Adds a key to the selected controls (sliders, spinners or toggles), if it's a picker or group selection the key will be added to the respective objects.
Delete Key
Deletes a key from the selected controls (sliders, spinners or toggles), if it's a picker or group selection the key will be deleted from the respective objects.
Delete All Keys
Deletes all keys from the selected controls (sliders, spinners or toggles), if it's a picker or group selection the keys will be deleted from the respective objects.