CurveIK Solver
the CurveIK Solver constraints a chain of nodes to a bezier curve that can be controlled with helpers. It's a lot better for character rigging than the default spline ik solver because it behaves like the setups that animators use with bendy limbs and toony characters. It also uses less objects and connections, it doesn't even use a spline object, the bezier calculations are done internally. You can save a lot time and work by creating a set up that is ready to use with just couple of clicks.
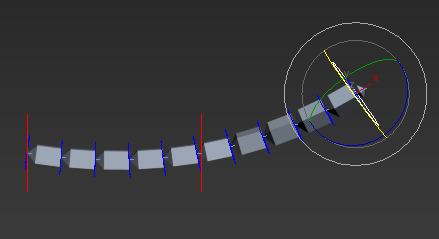
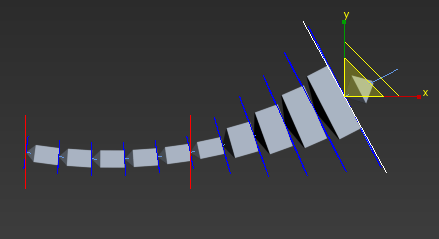
The point controls can also be used to manipulate the scale and the twist of the diferent points in the curve, the bones that are close to that point will follow that transformation.
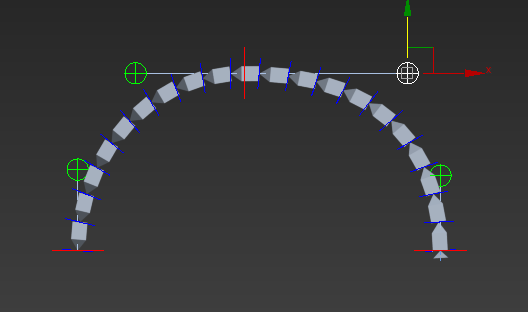
Optionally the user can also have tangent handle controls that can be used to have more control on the curve deformations.
Creation Method
Select an object in a hierarchy where you want the IKFK to start. Go to Animation menu > IK Solver > CurveIK solver. > Click the object in the hierarchy where you want the CurveIK chain to end.
This will display the CurveIK Solver dialog box where the user can define different parameters of the CurveIK Solver.
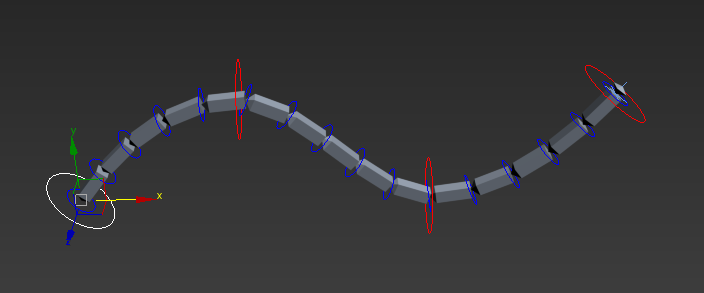
After pressing the "Ok" button this will create Control Helpers that the user can manipulate in order to interact with the solver: several big red controls to manipulate the deformation of the curve itself, several small blue controls to control the bones independently (if "bones controls" is on) and a CurveIK Chain helper where the user can access all the parameters of the solver.
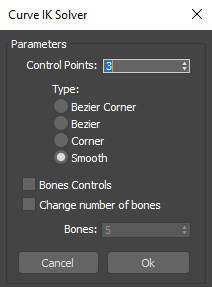
Control Points
This parameter defines how many Point Control helpers are going to be created, the animator can use these helpers to control how the curve is going to be deformed.
Type
This parameters defines the type of interpolation that the curve's points will have (Bezier Corner, Bezier, Corner or Smooth).
Bones Controls
If this parameter is checked additional controllers will be created in order to be able to manipulate the bones independently.
Change number of bones
If this parameter is checked the original joints will be replaced with a specific number of bones defined by the "Bones" parameter.
Bones
You can define the number of bones that will replace the original joints with this parameter.
Curve IK Parameters
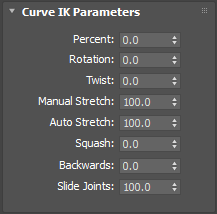
Once you assign a CurveIK Solver, you can access its properties by selecting the CurveIK Chain object and going to the Motion panel.
Percent
This is the position along the curve at which the chain is placed, as a percent of the overall curve length.
Rotation
The rotation amount, how much the joints rotate along their aim axis.
Twist
The twist amount, the rotation applied to the end of the chain.
Manual Stretch
This parameter controls the stretch of the chain independently from the curve length. A value bigger than 100.0 will increase the length of the chain, and a value lower than 100.0 will deacrease it.
Auto Stretch
This parameter controls how much the chain is going to stretch in order to reach the curve's length. If this value is 100.0 the chain will stretch fully, if this value is 0.0 the chain will not stretch at all.
Squash
This parameter controls the squash effect when the curve is stretched or contracted.
Backwards
If this parameter is 100% the chain will stick at the end of the curve when it's not auto stretched.
Slide Joints
If this parameter is 100% the chain will slide along the curve and the joints will try to keep a proportional distance between them. If it's 0% the joints position along the chain will be affected by the curve's points position.
Curve IK Wave
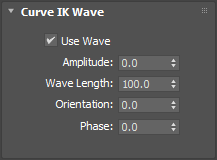
Use Wave
Enables/Disables a wave effect along the curve.
Amplitude
This parameter controls the height of the wave. It is the distance from the centre line (or the still position) to the top of a crest. or to the bottom of a trough.
Wave Length
This parameter controls the length of the wave, it describes how long the wave is. It is the distance from the "crest" (top) of one wave to the crest of the next wave.
Orientation
This parameter controls the orientation of the wave along the curve.
Phase
This parameter shifts the wave pattern over the object. Positive numbers move the pattern in one direction, while negative numbers move it in the other. This effect is especially clear when animated.
Curve IK Options
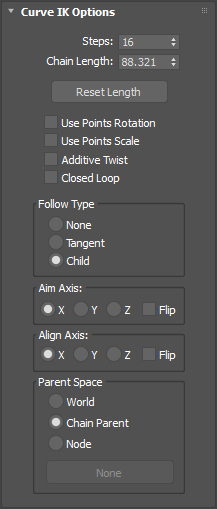
Steps
This parameter controls the sub division that the curve has for certain calculations inside the solver. If your IK animation seems to jitter, try increasing the Steps. Increasing the Steps will slow down the computational time, but should produce better results.
Chain Length
This parameter is used as a reference for the auto stretch functionality.
Reset Length Button
If this button is pressed the Chain Length property will be reset to the current curve length.
Use Points Rotation
If this parameter is ON the points nodes rotation will affect the rotation of the chain joints that are close to that point.
Use Points Scale
If this parameter is ON the points nodes scale will affect the scale of the chain joints that are close to that point.
Additive Twist
If this parameter is ON the individual point twist parameters will become additive with each other.
Closed Loop
If this parameter is ON the curve will be a closed loop, or in other words, the first point of the curve will become both the first and the last.
Follow Type
This control how the joints orientation will follow the curve (None, Tangent, Child).
Aim Axis
This parameter defines the axis that the joints are using to follow the curve.
Aim Axis
This parameter defines the reference axis that is used to build the aim rotation.
Parent Space
This parameter defines what criteria is used for inheriting transformations (World, Chain Parent, Node).
Curve IK Points
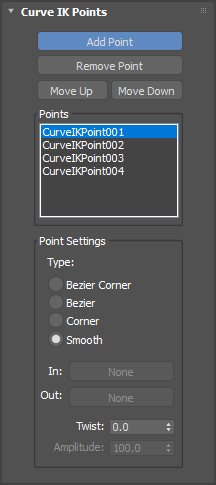
Add Point Button
Adds an object as a control point to the list of points in the solver.
Remove Point Button
Removes an object from the list of points in the solver.
Move Up/Down Buttons
Move the object in the list of points up or down respectively.
Point Settings
After you select an object in the list of points you can define some properties individually.
Type: This parameters defines the type of interpolation that the curve point will have individually (Bezier Corner, Bezier, Corner or Smooth).
In: With this button you can select an object to control the "In" tangent position for the selected point in the curve. Only available for points that have "Bezier Corner" or "Bezier" interpolation type.
Out: With this button you can select an object to control the "Out" tangent position for the selected point in the curve. Only available for points that have "Bezier Corner" interpolation type.
Twist: This is the twist parameter specific for the selected point in the list.
Amplitude: This is the wave amplitude parameter specific for the selected point in the list.
Curve IK Display
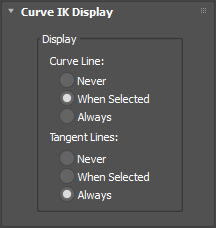
Curve Line
This parameter controls when the curve line is displayed (Never, When Selected, Always).
Tangent Lines
This parameter controls when the tangent lines are displayed (Never, When Selected, Always).